About a month ago, some of you may have been in the same boat as I, which is where the Smart Ink toolbar quit working with the latest version of Google Chrome. This was a great loss, but easily overcome by just using a different browser. You don't have to worry about it now. I just installed the latest update for Smart Ink and this problem seems to be fixed.
Showing posts with label google chrome. Show all posts
Showing posts with label google chrome. Show all posts
Monday, March 24, 2014

Friday, November 29, 2013
Google Chrome Extension: Voice Comments for Google Drive
For those districts using GAFE (Google Apps For Education) and specifically the ability to collaborate on work with staff and students and who have used the "Comments" part of any document, you might be interested in using "Voice Comments" extension. With "Voice Comments" you can quickly give and receive feedback on documents within Google Drive. This extension works well and is easy to use. A nice newly added touch to Voice Comments is the ability to add external links such as Youtube videos that might just help students get a little more information about their topic. Give it a try, I think you will be impressed.

3. When you first enter the site you will need to click whether you are an educator or not.


1. First you need to install the extension by going to this link. Voice Comments
2. When you first install Voice Comments you will need to click the "Accept" button.

3. When you first enter the site you will need to click whether you are an educator or not.

4. You will be asked to pick a file that you want to open.

5. Once the file is open just highlight a specific area of text. You can't highlight images though. Above the highlighted text you will be given 3 options. The first is to give a voice comment. The second is to give a comment by typing. The third is to add a resource to the highlighted area. Click on any of them.

6. If you are leaving recorded voice you will need to make sure you allow the site to use your microphone. Just click "Allow" and "Remember" and then close the window.

7. You might also get a note at the top to "Allow" or "Deny" in your browser. Make sure you click "Allow." I only had to do this once when first configuring Google Chrome.

8. Just click the "Record" button for voice commenting.

9. You and your students will just need to click the "Play" button next to the time and you can hear your comments.

10. The feedback button just lets you type some comments in like you normally would.

11. The resource button allows you to add links to more information about your students work.

12. On the student's side of things they will go to their Google Drive and check the document that they want to view feedback in.

13. They will click the "More" button at the top of Google Drive and select the "Open with" option and then select the "Kaizena" option. Your students will also be asked to go through the configuration process granting permission to use Google Drive and their Microphone.

14. Your students should now be able to view your comments and add or delete comments themselves.
Comment below describing any experience you may have had with this extension and how you might be using it in your classroom.
Monday, August 5, 2013
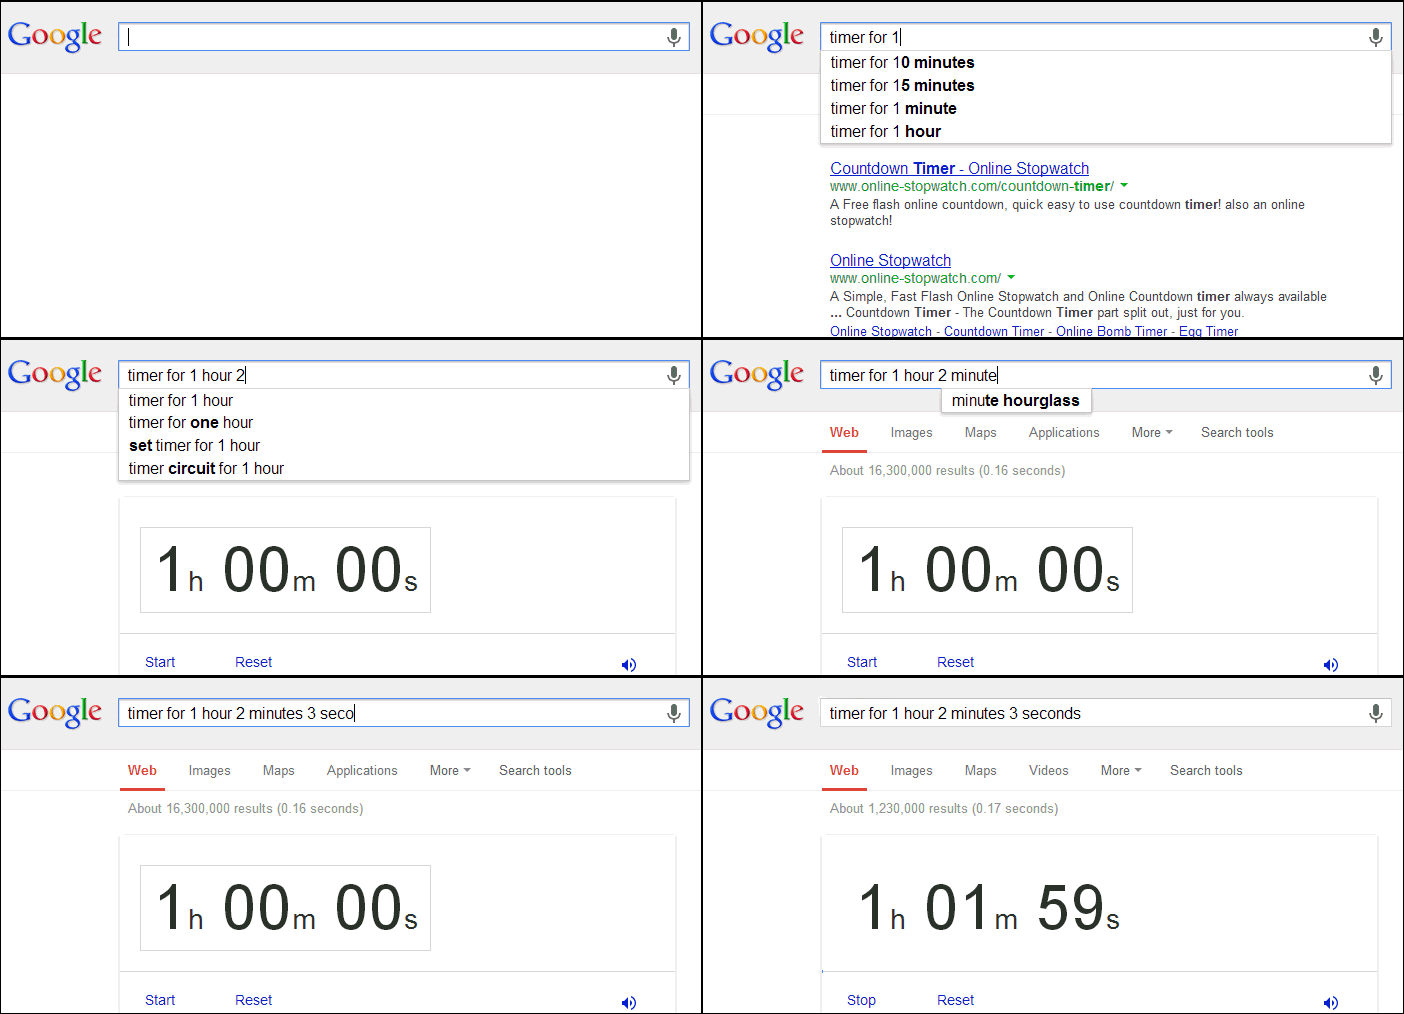
Google Search: Create an instant countdown timer using Google Search.
I love this Google tool. I wish I would have seen it sooner. Google, though now has a timer. It is extremely easy to use and within a second you can get a timer ready for your students. I plan on using this to moderate my lesson plan times this year.


Tutorial
1. In your browser using www.google.com, all you need to do is start typing a timer phrase using the word "Timer." Hit enter and your timer begins a count down. You can stop it, reset it, mute and unmute the sound.

2. If you are using Google Chrome, all you need to do is type the timer phrase in the URL address box, hit enter and your timer will appear and begin to count down. There is an example below.

Definitely cool stuff. Next time I have to give a Standardized text, I am using this time. Comment below to let the community know how you are using online timers in your classroom.
Saturday, August 18, 2012
In case you missed it: GCalendar, Smart Ink, and GSites
For those of you who have just started teaching the new school year, or are getting ready to, here are some educational tools and ideas for you to create a virtual environment for your students and parents that will enable you to have better communication throughout the year.
Create a Google Site
Create a Google Site
- I find that having a site that your students can go to to find information and get resources needed to better understand school content is very valuable. This tutorial will demonstrate how to create a Google website that can be used to post resources and other information for your K-12 classroom.
- Every class should have a calendar that is visible online so that your students can view due dates of assignments and tests coming up. It also allows for parents to keep better track of their students educational lives. This tutorial will demonstrate how to create multiple class calendars that can be visible online.
- After you have created class calendars you need an easy method for your students to locate it and other information. What better place to accomplish that than embedding the Google calendar into your website. This tutorial will show you how.
- Have you ever had an embarrassing ad pop up while browsing the internet with your students. If you browse with Google Chrome you can install an add-on that will block those ads from being visible.
- Have you installed Notebook 11 and noticed the "Smart-Ink" tab on every window that you open. Some teachers have express an annoyance with it so this tutorial will show you how to turn it off.
Thursday, March 29, 2012
Google Chrome Tip and Trick: Capture annotate
There are many ways to capture a screen so that you can use images from the internet or another program that you have on your computer. People use capture software all the time so that they can take a picture of what they are looking at and then use it on a blog or website or just to email a friend to ask a question.
Google chrome has a few of these. The one I use is called "Capture Annotate." It allows you to quickly capture an image from a web page, edit it, and then save it.
Disadvantages:


Google chrome has a few of these. The one I use is called "Capture Annotate." It allows you to quickly capture an image from a web page, edit it, and then save it.
Disadvantages:
- It is software that is installed on your Google Chrome browser so this won't work for you if you want to capture images from another piece of software such as "Microsoft Office." You must be in Google Chrome browsing the internet to use this extension.
Tutorial
1. Go to the following link and then click the "Add to Chrome" button.
2. Once it is installed you will see this icon at the top right of your Google Chrome browser.
3. Now navigate to a specific web site from which you would like to capture an image and then click the Capture icon. You will get three options. If you want to capture everything you see on the website, use the first option. The second option allows you to draw a square around a specific area and will take a picture of everything in the square. The third option lets you capture the whole screen.
4. In this tutorial I am going to take a picture of a specific are on Google and then edit the image. Once take your picture of a specific area you will be take to a new window or tab. The first button will let you crop the image a little smaller. You can use the second and third buttons to draw a square around a portion of your image. Then you have your lines, the arrow, straight line, and squigly line. I really like the button that looks like a rain drop. This is nice because you can use it to "blur" out information that is more confidential. The "A" button allows you to type directly on your image. The next button over will give you a color option so that you can change the colors of your markings. Finally you have your "Undo" button and your "Done"button.

5. The image below demonstrate all of the different tools you can use on your image. Once you are done editing it, click the "Done" button.

6. Now you will see the "Save" and "Copy" buttons. If you want to save your image permanently on your computer then click the "Save" button. The "Copy" button allows you to copy the image and then paste it somewhere else.

That is all there is to it. A piece of cack.
Thursday, March 1, 2012
Google Chrome Tips and Tricks: Print Selection
About a month ago I was asked how to do a "Print Selection" inside of Google Chrome. You know, the ability to print just a specific paragraph or sentence out of the whole online artical that you are reading. So going out and doing some research, I came across "Print Friendly," which is a nice little Google Chrome extension that allows you to cut out the parts of an artical. This extension is great for getting rid of ads and other unwanted material from the artical that you are reading. Even though "Print Friendly" is nice, it can take some time deleting all of the stuff you don't want, instead of just highlighting and printing the parts that you do want. I even came across another extension called the "IE Multi Tabs" which converts the page you are looking to an internet explorer page. Once viewed in "IE Multi Tabs" you can then highlight what you want, right click on the selection and then print it off. Even though this is easy to do, I am a big fan of making life even easier.
Well thanks to reader Yuri Dolgov, I know another way that you can just print the selection of text that you do want. Believe it or not, it is called the "Print Selection" extension. I can't believe I didn't see this extension the first time I went around looking.
Here is how you go about installing and using the "Print Selection" extension.


Well thanks to reader Yuri Dolgov, I know another way that you can just print the selection of text that you do want. Believe it or not, it is called the "Print Selection" extension. I can't believe I didn't see this extension the first time I went around looking.
Here is how you go about installing and using the "Print Selection" extension.
Tutorial
1. Make sure you are in the Google Chrome browser.
2. Click on the "wrench" icon.
3. Choose the "Options" option.

4. Click the "Extensions" tab under the "Options" section found on the left side.
5. Click the "Get more extensions" link.
6. In the search box type in "Print Selection," and then hit enter.
. Find the "Print Selection" extension and then click the "Add to Chrome" button.


8. A box will pop up, click the "Install" button.

9. Once it is installed, just go to a website, highlight the text, and then right click on the text and you should see a "Print Selection" option. Click the option and that will take you to the standard Google Chrome print screen.

Well happy printing and enjoy using Google Chrome.
Friday, January 13, 2012
Google Chrome Tips and Tricks: Changing how Chrome Downloads
A concern has come up in our district, as we push the use of Google Chrome, and that is many teachers just don't like how Chrome downloads files; and I agree.


By default Google Chrome downloads files from the internet to the "Download" folder. In Internet Explorer give you a choice as to where you want to download files. I do like Internet Explorer's way of downloading. No problem though. In one minute you can change some settings so that Chrome asks you where you want your files to go.
Tutorial
1. Click on the "Settings" icon found on the top right corner of Google Chrome.

2. Click on the "Options" option.

3. Scroll to the bottom and click the "Show advanced settings" link.

4. Find the section that says "Downloads." Make sure the "Check" box "Ask where to save each file before downloading" is checked.

5. If you don't mind Chrome downloading to a specific folder every time but want to change the location just click the "Change" button and change the location and then click the "OK" button.

6. Now when you click a "Download" link on a web site, Google Chrome will now ask you to where you want to down the file.

Saturday, January 7, 2012
Google Chrome Tips and Tricks: Education Safe Youtube
First of all, if your school doesn't allow Youtube to be part of it's education, they are behind the times. Now I am not advocating opening up Youtube for students unless you are using a filter designed to work with Youtube's education package, which is great. I am advocating that teachers be allowed to show videos during class. There is just too many wonderful educational videos on Youtube to allow the garbage that is also found there to be the reason that teachers cannot use it.


That being said, I completely understand the administrator's worry about projecting a video in front of the class and having comments that use vulgar language or related videos that show disgusting images be seen by students. Many districts allow teachers to download videos after hours and then use a media player to play them the next day. The problem with that is students can now use video creation as a means of being assessed for certain classes. As a teacher I think it would take more time than I want want to take to download them all.
Another solution has been for teachers to use sites like ViewPure.com, which is a good method of creating a safe Youtube viewing experience. On sites like this, the teacher copies and pastes the url into the viewpure website and then they can watch the video safely. Sure it is a good program, but what if there was just a simpler way to filter out the comments and related videos option. Well guess what? There is.
Today I would like to introduce another awesome extension for Google Chrome, called "Youtube Options for Google Chrome."
What does it do?
- You can literally customize your Youtube viewing page. You can take away the comments, the ads, the heading, and the related videos.
- You can tell the extension at what video quality you want to see, so that you don't have to manually change it later.
- These are just some of the features I like, but it is much more customizable than what I just stated. Lets play with it and see.
What are some drawback to using it?
- So far I haven't found one. I am actually a new user of this tool but I will change this statement if I or somebody else come up with a flaw.
Youtube Options for Google Chrome Tutorial
1. Make sure you are in the Google Chrome browser.
1a. If this direct link doesn't change you can get to the extension here.
1a. If this direct link doesn't change you can get to the extension here.
2. Click on the "three bar" settings button.

3. Choose the "Options" option.
4. Click the "Extensions" tab under the "Options" section found on the left side.
5. Click the "Get more extensions" link.
6. In the search box type in ?YouTube Options for Google Chrome."
7. Click the "Add to Chrome" button.
8. Click the "Install" Button.
9. After you first install the extension you will see the Extension Options page. On the left hand side you will see "Video, Layout, and Sites." These are the sections that you can edit.
10. In the "Video" tab you can change these options. Just read each section and change it to your preferences.

11. You will be able to change the following parts of Youtube in the "Layout" view.

12. Finally in the "Sites" section you can specify which other video sharing sites you want this extension to try and change for you.

13. If you ever want to change the options after you have closed this page just go back to steps 1-4 and then find the "YouTube Options for Google Chrome" on your "Extensions" page and click the "Options" link.

Again this is truly a needed extension for the Google Chrome user who plans on showing Youtube videos in class.
Thursday, January 5, 2012
Google Chrome Tips and Tricks: Print Friendly
I am really taking a liking to Google Chrome. The more I use it the more fun I have and the faster I get my daily tasks done. I am thinking about doing a whole series on Google Chrome because they have so many cool add-ons like "Print Friendly." I have had a few complaints from converts to Chrome, saying that in Internet Explorer they could highlight a paragraph and then right click on it and print just the selected text. This is a problem for those who believe in saving paper and ink. I don't want the whole page, I just want part of it. Sooooo, what is the solution? Print Friendly.
What does it do?


What does it do?
- Print Friendly immediately deletes all ads that are found on the page so you don't end up printing them.
- It allows you to delete any picture, paragraph, or title from the page.
- You literally get to print the parts that you want.
What are some drawback to using Print Friendly?
- To be honest, none that I have seen except an annoying ad that you have to close when you are done printing.
Tutorial
1. Make sure you are in the Google Chrome browser.
2. Click on the "wrench" icon.
3. Choose the "Options" option.
4. Click the "Extensions" tab under the "Options" section found on the left side.
5. Click the "Get more extensions" link.
6. In the search box type in "Print Friendly," and then hit enter.
7. Find the "Print Friendly" extension and then click the "Add to Chrome" button.
8. A box will pop up, click the "Install" button.
9. At the top of Chrome you will now see a "print" icon. When you find a page that you want to print portions of, click the "Print" icon.
10. A box with the webpage and the pictures will then pop up. Notice that all the ads have already disappeared.

11. Hover your mouse over any portion of the page that you do not want to print and then click on it. It will instantly remove that section and shift everything up.

12. At the top of the box you have a few options. You can change the font size, choose to delete all pictures at once. You can also undo any mistakes that you may have made when deleting.

13. Once you have made your document adjustments you can print, email, or change the document to a PDF.

Well there you have it. Another fine tool created to help educators get their job done nicer, neater, and quicker.
Subscribe to:
Posts (Atom)