Search for Web 2.0 Tools

Saturday, June 22, 2013

Create graphs for your math class with this excellent web 2.0 graphing calculator tool

Attention all math teachers.  Have you ever wanted to create, print, and demonstrate graphs in your classroom?  If so then using Desmos would be an awesome web 2.0 tool for you to look into.  This graphing calculator can graph anywhere from simple to complex graphs.  Just add the formulas and the graph will appear quickly.  You can then save, print and share your graphs via email, website or your classroom blog.

Tutorial

1. Go to the following website:  www.desmos.com

2.  When you first arrive click the "Launch Calculator" button.


3.  On the left hand side, enter the mathematical formulas you want to demonstrate to your class.  You will notice your graph on the write appear as you type in the formula.


4.  If you want to save the graph, you will need a user login.  Just click the "Create" button at the top.  Now in the "Untitled Graph" text box found just above your graph.  Give your graph a title and click the "Save Graph" button. I also really like the fact that you can save the graph into your Google Drive which will then give you a whole bunch of different sharing methods.


5.  One of the really neat ideas about Desmos is that if you use a Smartboard in the classroom or any other type of Digital Whiteboard, you can use the input tool found at the bottom of the screen.  This will help you to continue to stand in front of the class while giving instructions on how to use the graph. 


6.  If you don't see the Desmos keyboard, then just locate the minimized button at the bottom that looks like the picture below.  Click it and the number pad will reappear.


7.  Now if you want to print or share you graph, just locate the options in blue at the top right corner of your screen under you login name.  To print, just click the "Print" icon.  To share just click the "Share" icon.


8.  After clicking the "Share" icon, you will first see a link that you can use to link to your graph.  If you would like to embed the graph into your blog or website, just click the "Embed" button and then copy and paste the code into the HTML portion of your website.  An example of an embedded image is at the very end of this blog post.  Finally you can click the "Image" button which will allow you to save the image so that you can use it wherever you would like.


9.  Just past the print and share buttons is the "wrench" or "settings" button.  This will give you some advance options for your graph.  One of the options that is a fantastic idea is the "Projector Mode" button.  This will make the lines of your graph darker and thicker so that the lines are more visible to your students.


Desmos is truly an easy solution for demonstrating how to graph.  Get as complex as you want.

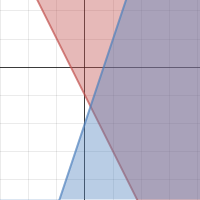
Here is an example of an embedded graph from Desmos.

Friday, June 21, 2013

Practice writing in the classroom with Carnigie's MyStory Maker

My Carnigie's story maker is an excellent tool that can be used for teaching creative writing to your students. With this tool, students will be able to create a story in minutes, with animation if desired, and then share their story with somebody else or even create a print out.  My Carnigie Story Maker is extremely user friendly and students can get started within minutes and won't need much training to do so.  Students will be able to get their creative juices flowing as they practice their English Language skills and if you happen to be a Foreign Language teacher, this site would be great for your students as well.

Tutorial


2.  Click on the "Click to Begin" in the middle of the book image.  Once you have a story you can access it by typing in a code that will be provided at the bottom of the book image.


3.  Your students will now write their names in the book.  Click the "OK" button.


4.  Your students will now pick a character from the "Character" list.


5.  They will now set a general plot for the story.  For my story I chose the "Make Friends" option.


6.  Now you can select another main character for your story.


7.  Now that your story premise is set up, click the "OK" button that should now be visible.


8.  You can either view the instructions or you can click on the "Start Story" option to get writing.


9.  At the bottom of the page is where you can create the written portion of your story.


10.  If you click on one of your characters, you will see new options appear at the top left corner of your screen.  With these you can animate, add facial expressions, and have your characters interact with each other.


11.  if you want to move to the next page just click the green arrow at the bottom of each part of your story. Also have your character use many of the objects.  You can change your setting as well as add setting objects.  Your students will have a ton of fun designing their stories using the built in objects and animation capability.

12.  Once you are done with your story you can click the preview button which will show you what your book would look like and if you are satisfied just click the "End" button.


13.  The Story Maker will now start publishing your book.


14.  Your students will now have the ability to view their story from this next screen.  Note that they should write down their "Magic code" if they want to gain access to their stories again.  You can also print their stories in full color to make magnificent printed books.  Your students will be able to email their stories home using the "Share" button.  Finally you can create PDF versions of your story so that you can use them for years to come or highlight the best work of your students over time.