Keeping your classroom site up to date is key if you want your students and parents to actually use it as a means of communication between you and them. One of the neat trick with Google sites is the creation of a news feed that you can place into your site so that your students can see new and important notices quickly. The tutorial below demonstrates how to create, post and delete announcements from within a Google Site.


13. Click on the "Insert" from the menu bar and then choose the "Recent Post" option.


Tutorial
1. Log into your Google account and navigate to your classroom website.
2. Create a new page by clicking the "New page" icon.

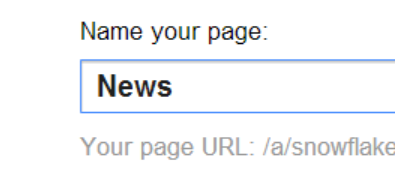
3. Give your page a title. In my case I just call it news and let my students know that is where all my announcements will be shown.
4. Click on the type of template you want to use. Choose the "Announcements" template.

5. Select where you want your page when it comes to navigation. Either the top level or home works just fine.

6. Now just click the "Create" button.

7. This will now take you directly to the new page you created. To add a post just click the "New post" button. You can also see that your students can also subscribe to your news announcements.
8. Give you new post a title.

9. Give some detail to your post.
10. Notice at the bottom you can also click the "Add files" button which will allow you to upload documents such as homework sheets or study guides. TIP: If you plan on adding files, make sure you either save your post first, or add the files first because if you type in your title and details without saving and then click the "Add files" button, it will refresh the page and not keep the info that you have already typed. I learned this tip the hard way, more than once.

11. Make sure you hit the "Save" button and you now have your new post.

12. So far you have just created a post. We now need to add a place where your students can have easy access to the information. So now we are going back to the Home page and add a section for you news postings to show up. Click on the "Edit" icon so that you can get your edit tools.

13. Click on the "Insert" from the menu bar and then choose the "Recent Post" option.

14. Click the drop down menu to see which pages you can pull announcements from. Choose the one we just created.

15. Decide how much and how many of the posts you want displayed.

16. Add a title and then click the "Save" button.

17. Your post is now visible on your home page.

18. Now keeping your news up to date is key to being successful. Your students and parents will appreciate it. So that means you don't just create new news but also delete old irrelevant news. The following instructions demonstrate how to delete postings. Just click on the news item you want to delete. This will take you to the place where you can edit or delete your news.

19. Click on the "More" button at the top.

20. You should now see a "Delete" page option. As long as you are on the post's page and NOT on your news page which will show all of your posts, clicking the "Delete page" option will just remove that post.

21. Another TIP would be to create an easy access point for not only your students but for you as well where you can get to your "Recent Announcement" page quickly. I always add it to my navigation bar somewhere. The following instructions will demonstrate how to add your Recent Announcement/News page to your main navigation bar. First click "More" button again and choose the "Edit site layout" option

22. Now when you hover your mouse over the navigation bars you will see that you can edit them. Just click on one of your navigation bars.

23. You should now see a list of all of the pages and links found on that bar. Click the "Add page" link.

24. Navigate to the page you want to add to your navigation bar. In this case I select the "News" page and then will click the "OK" button.

25. Then click the "OK" button on the next screen as well.

26. You should now see the page added to your links. When you want to add a new post and start all over, just click your "recent announcements" link which will take you to the page where you can add new announcements.

No comments:
Post a Comment