Search for Web 2.0 Tools

Friday, December 30, 2011

Create Concept Maps with Bubbl.us

A concept map, other names are flow chart, webbing and diagramming, is used with students to help them generate ideas and organize thoughts on a certain topic.  Take a concept and from there branch off using different styles that make it easier for a student of the subject to understand and further the concept.

Today I would like to highlight Bubbl.us.  This is one of the easier and more versatile concept mapping software online.


What is it?

  • Bubbl.us was created by two Russian programmers who were trying to figure out a web based solution for others to organize their thoughts with.  They succeeded.
  • Extremely easy to use.
What can you do with it?
  • Create concept maps made out of bubbles.
  • Export it as a picture to be used.
  • Export it as an html outline.
What are some disadvantages to using Bubbl.us?
  • Registration is required.
  • Only one type of map can be created.
  • Limited to three maps without upgrading your account.

Video Tutorial (Click the Full screen icon for the larger preview.)


Visual Tutorial

1.  Go to www.bubbl.us
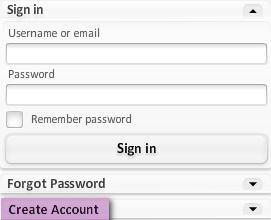
2.You need to register if you haven't yet.  Click the "Create Account" button on the right of the page.


3.  Fill in the required fields.  Then click the "Create Account" button.

4.  Once your account is created sign in.
5.  Once you are logged in click the "Sheet" button to create a new concept map.
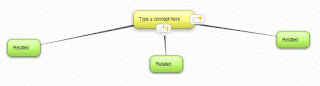
6.  You will now see your first "Bubble."  Type the concept you want to discuss with your class in the bubble.
7.  Hover over your bubble to get a menu.  The color icon allows you to change the color of the text and bubble.  The size 
8.  When you want to add another section to your concept, hover over the bubble and click the "New Child Bubble" icon.
9.  Add as many bubbles as you want.  In this example I added three "Child Bubbles."


10.  Make more room for your bubbles by left clicking and holding the click and then drag them in any direction


11.  Now you have room to add more "Child bubbles."


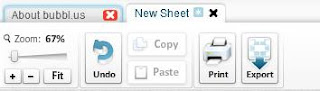
12.  After you are done creating your concept map you need to decide what to do with it.  If you want to print it, just click the print button.  If you want to use it on your website, a worksheet, or a blog you need to export it as a picture, so go ahead and click the "Export" button.


13.  Decide what type of image file you want to use and then click the "Export" button.  This will now download the image of your concept map to your computer.


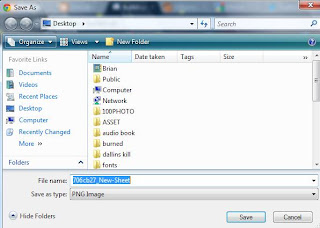
14.  Choose the location you want to save your picture to and then click the "Save" button.


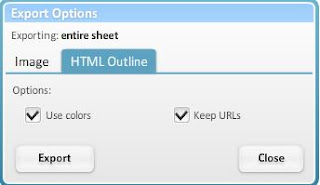
15.  A neat trick with using bubbl.us is that you can also export your map as an outline that you can use in your class.  Give it a try by clicking on the "Export" button and then selecting the "HTML Outline" tab and then once again clicking the "Export" button.


Again, using Bubbl.us is one of the simplest means of having your students organize concepts in your classroom.  If you are looking for an easier solution or even a more complex one try some of the other concept map makers found on the "Web 2.0 Tools List" page.

Tuesday, December 27, 2011

Using Socrative in the Classroom - Part 3

In this post we will explore how to make a quiz on Socrative.

First, log in to the Socrative teacher site.


After you log in, you will see the main quiz screen. When you get to the quiz screen, select "Create a Quiz"


You will need to give the quiz a name:


You can now add questions. The quiz give you multiple choice and short answer options. If you want to make a true/false question you can make a multiple choice question with just the true or false options.

If you select "multiple choice" you will get this screen:


You can type your question and then provide possible answers. You will need to check the box of the one that is the correct answer.

If you want to add a short answer question, click "short answer".


The first question will move up and your second question is now ready to be written. 

Once you are finished with your quiz, make sure you save it.

You can now give the quiz to your students. Click the "main screen" tab on the top left.

Click "Start Quiz"

You can select which quiz you want to give. It defaults to the last quiz you created.

You can also choose between "student paced" and "teacher paced" quizzes. 

A student paced quiz allows the students to take the quiz as fast or as slow as they wish. 

A teacher paced quiz allows the student to answer only one question at a time. This allows the teacher to dictate how long a student takes on each question. Once the teacher clicks to the next question, the students are not able to go back to answer previous questions.

Select which one you want and then give the students the room number. The students would take the quiz and if you click "live results" you would get the results on your screen.

The live results would look like this:
Since the teacher would have to grade the short answer questions, the results of those questions wouldn't show up here.

When the class is finished (or time is up), click "end activity"

You will then be given an option to have a report e-mailed to you, download the report, or have no report at all. You can go back later and retrieve the reports if you wish.

If you select "email report", you'll get a report in your email. I selected "view as Google Doc" when I got the e-mail, and here is what the report looks like:


Sometimes students forget to log off of Socrative after they finish. If you wish to get everyone logged off, you can select "clear room" (on the main screen) and those students will be logged off.


It is nice to have a collection of quizzes on Socrative. One suggestion would be to make sure they have easily identifiable and sortable names. Otherwise you end up with something like this:


Happy quizmaking!

Monday, December 26, 2011

Create an online journal with Penzu


Throughout the ages of educational ideas and philosophies teachers have been big fans of having their students keep a journal.  Journals are kept in language arts, foreign language classes, and I have seen them in science classes.  Students don't particularly like doing them unless they enjoy writing.  If given a choice between keeping a journal in their spiral notebook and keeping it online, I would wager that a majority of students in this digital age will prefer to keep it online.  So why not give them the choice and tool of Penzu.com.

What is it?
  • Penzu.com allows anybody to keep an online journal for free.  Students can easily use this site as a means of recording daily information, science experiments, or even a journal of events that are occurring in the country for a journal in social studies.
What are some negative drawbacks of the site?
  • Penzu's free edition of online journaling is great.  However there are many tools that they offer to those who purchase the pro version that the free version doesn't give you.
  • You must be registered to use the site.  This really isn't a drawback simply because this allows for your work to be completely confidential, but many students still don't have email addresses.  I guess you could put a bogus email address in if a student absolutely had to.
What are some of the great features of Penzu?
  • Students can share their journal with their teachers.  
  • Teachers receive the journal via email.
  • You can insert images into your journal.
  • Penzu has pretty good formats for the text.
  • It has a realistic feel of being a journal.
  • Has an automatic save feature as you are writing.

Tutorial on how to use Penzu.

1.  Go to www.penzu.com

2.  Click the "Create your Free Journal" button


3.  Fill in the correct information and then click the "Submit" button.


4.  Select the style of your avatar and then click next.


5.  Click next again unless you really want to "Tweet" about it.


6.  Click "Next" again.


7.  Choose your font style and then click the "Done" button.


8.  You have now created your Penzu journal.


  • Don't click the "New Journal" button.  That is a button that tries to get you to use their premium services.  Of course if you want all the bells and whistles then you should click the button.
9.  On the cover of your journal click the following icon.  It looks like a bookmark.


10.  At the very top of your journal you will see your tool bar.  Some of the icons are for premium services but most are for the free journal.  Click the "plus" icon to get started with your first entry.

11.  Now you can start writing in your journal.  A nice feature is the automatic save.  You don't need to worry about hitting the save button.
12.  When your students are ready to share their journal with you, they just need to click the "Envelope" icon on their tool bar.  This will open up the following dialogue box.  They just enter your email address and then hit the "Share" button.  In a few minutes you will get their journal entry.

That is all there is too creating a pretty cool online journal.


Thursday, December 22, 2011

Having trouble at home because you don't have a textbook, try using Khan Academy

Recently our district has moved to a "Beyond the Textbook" philosophy.  Teachers are encouraged to move away from the textbook and into more interactive, hands-on, engaging method of teaching.  In doing so though this has left some parents and students who are used to using a textbook as guidance in learning their materials, that some are feeling a little lost and struggling with ideas on where to get materials that they can use to help their students understand the concept being studied.  This problem is found mostly in the study of mathematics.

Today I am going to blog about Khan Academy.

What is it?

  • Khan Academy was founded by Salman Khan.  His creating a huge "bank" of education tutorials that are easy to follow and understand.  Right now he has created over 2700 videos mainly for math, but has recently been adding other subjects like science and art history.  He is now backed by Bill Gates, Google, and a half a dozen other companies that want this site to succeed in helping students from around the world to have a free source of educational material.


What can you do with it?
  • When it first started, the site was all about Youtube video tutorials.  Now you can watch the tutorial and then actually practice it online.  After the practice you can take a quiz to see how you are doing.  Once you have mastered the concept it will keep track of your progress and reward the student with points that can be used to earn badges.  Again, the way Khan presents the material makes it easy for a user to understand.
  • These videos can also be embeded.  In other words you can take the embed coded and place these videos right into your own website or blog so that when your students go to your site they will have direct access to the specific video concept you would want them to have.
How do you use it?

1.  First go to www.khanacademy.org .

2.  You could then just start browsing the videos and start watching the concept that you need, however I would recommend signing up for the academy so that it can keep track of your progress.

3.  To sign in, click the login button in the top right corner of the screen.  This will take you to a login screen.


  • I find that the only thing I don't like about the site is that it forces the user to login with either a Facebook account or a Google account.  Now creating those are both free, but I wish it would allow you to create an account for just Khan Academy.
4.  Click either the Google or the Facebook button and then agree with the following screen.


5.  Congratulations you are now set up as a Khan Academy student.

6.  At the very top there is a search feature.  Just give a few key words of the concept you are studying and this will pull up a list of videos that you could watch.


  • As you watch the video you will notice the points found below the video increasing.  The longer you watch the video the more points you receive.


7.  After you are done watching the video click the "Practice" link at the top.


8.  Now you can search for that same lesson in the practice search box.


9.  Click on the right lesson.


10.   Solve the problem and enter the answer in the answer box.  The neat thing is that if you get it wrong you can click the "Next Step" buttons and see how to solve it.


11.  If you want to see how you are doing on your progress then at any time just click on your name at the very top of the screen.


That is really all there is to using Khan Academy.  I highly recommend this site for those who need a little added help or need refreshers on helping your own children.  If you are a teacher and need a resource that your students can use as a reinforcement tool, then www.khanacademy.org is the way to go.